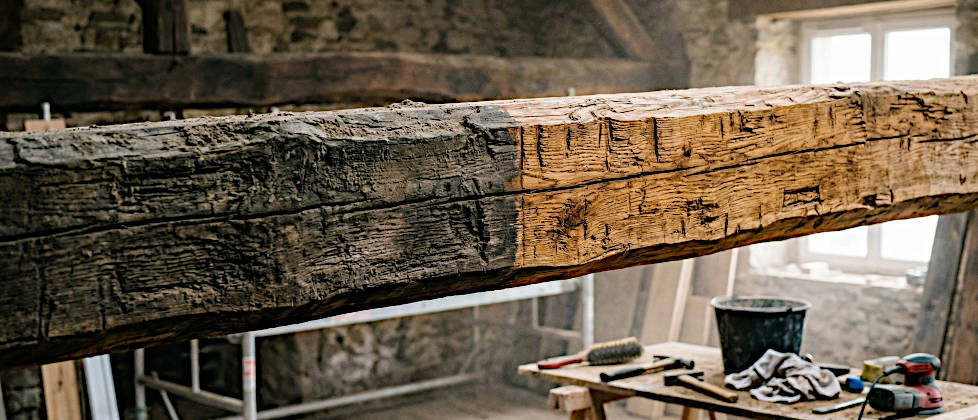
When exposing old, hand-hewn oak beams in your home, you often face a major challenge: the beams have darkened significantly over the decades or centuries, they have often been painted – at best with easily removable limewash, at worst with stubborn oil paint – or they are simply extremely dusty. To fully bring out the rustic character of the hand-hewn beams indoors, they must be cleaned.
But which method is the right one for hand-hewn oak beams? In this article, I compare the most common approaches: low-pressure sandblasting, dry ice blasting, and mechanical sanding using a brush sander or a wire brush attachment for a drill or angle grinder.
Preparation: Safety and Preliminary Work
Before you choose a method, there are steps and safety precautions that are absolutely essential. Old beams are often full of surprises and carry hidden risks.
Important Health Warning: Oak Wood Dust
Oak wood is beautiful, but its sanding dust is extremely dangerous and is considered carcinogenic. When sanding or blasting oak beams indoors, professional respiratory protection (at least an FFP3 mask) is absolutely mandatory. You must ensure powerful dust extraction (dust class M or H) and completely seal off adjacent living spaces to avoid endangering your health and that of your family.
My practical tip: Meticulously examine the wood for old, hand-forged nails, screws, or staples. A metal detector, more precisely a so-called pinpointer, does a great job here. Personally, I use the Garrett Pro-Pointer 2 for this task. Thanks to its handy shape, you can scan the beams centimeter by centimeter and accurately locate even deeply embedded metal parts that are often invisible from the outside.
Since it is extremely time-consuming to put down the tool after every find to pull the nail, I work in stages: Find the metal piece, make it visible, and simply mark the spot with a dot of spray paint. This way, you can complete the entire search first. In the second step, you take the tool and remove or countersink all marked nails in one go. In the third step, do a quick final check with the pinpointer. The sprayed paint will simply be removed during the subsequent cleaning (sanding or blasting) anyway. Take this preparation seriously: an overlooked nail can not only ruin your brush sander immediately, but it can also cause dangerous sparks or unsightly rust marks during blasting.
The Comparison: Blasting, Brush Sander, and Wire Brush
Hand-hewn wood is characterized by its uneven, wavy surface – the so-called axe marks. This is exactly the structure you want to preserve.
Method 1: The Brush Sander (Burnishing Machine)
A brush sander with a nylon or brass brush is an excellent choice for DIY enthusiasts. The rotating brush adapts well to the unevenness of the hand-hewn wood without changing its basic shape. This gives you very good control over the material removal.
Method 2: The Wire Brush (for Drill or Angle Grinder)
A very popular and inexpensive variant is the use of wire brush attachments (cup or wheel brushes) for the drill or angle grinder. This method is significantly more abrasive than the standard brush sander. This is particularly advantageous if you need to remove stubborn oil paint. In addition, narrow wire brushes are excellent for reaching into large cracks and deep joints in the wood. But beware: the rotating wire bristles can be extremely aggressive and leave deep grooves in the wood if too much pressure is applied.
Method 3: Low-Pressure Blasting
In low-pressure blasting, a fine abrasive (such as glass beads, walnut shells, or special sand) is blown onto the wood with relatively low pressure. This method cleans deep into the tightest crevices and wormholes that you would never reach with a brush. The result is often very uniform.
Method 4: Dry Ice Blasting
A particularly gentle premium alternative is dry ice blasting. Here, frozen CO2 pellets are shot at the wood, blasting away dirt or stubborn oil paint upon impact, and then immediately dissolving into gas. No abrasive is left behind, only the removed dirt. This method is extremely gentle on the historical wood structure, but usually more expensive as it is almost always carried out by professionals.
Cost-Benefit Comparison & Important Warning Regarding Patina
Mechanical Sanding (Brush Sander & Wire Brush): Lower initial costs (approx. 100 to 300 euros, wire brush attachments are even cheaper), ideal for smaller areas and individual rooms. Good for limewash, but soft brushes smear quickly with tough oil paint, which is where the wire brush shows its strengths. However, the time required is enormous, and the work is very physically demanding.
Low-Pressure & Dry Ice Blasting: High costs for renting a compressor and blasting equipment or hiring a specialist company. However, these methods save an extreme amount of time for large areas and thick layers of paint.
Warning: Proceed carefully with all methods! Too aggressive removal (especially with coarse wire brushes) destroys the historical patina and the unique axe marks of the oak beams. Once sanded away, this historical character is irretrievably lost.
Step-by-Step to the Perfect Beam Look
To ensure your project is a success, you should proceed systematically:
- Remove nails from the beams: Pull all metal parts with pincers or a crowbar. If they are stuck too tightly, drive them deep into the wood with a punch.
- Choose a method: Weigh up whether to use a brush sander, a wire brush, or a blasting method based on the room size, your budget, and the coating (limewash vs. oil paint).
- Install dust extraction and protection: All methods generate immense amounts of dust. When sanding, a strong industrial vacuum cleaner connected directly to the machine is mandatory. When blasting, you must completely cover the room with plastic sheeting and create negative pressure. Due to the carcinogenic oak wood dust, wearing an FFP3 respirator mask is absolutely essential!
- Surface treatment with boiled linseed oil: Once the wood is cleaned and free of dust, the finish is applied. Paint the oak beams with high-quality boiled linseed oil (Leinöl-Firnis). The oil enhances the grain, protects the wood, and gives it a warm tone. Especially as a photographer, I appreciate how the linseed oil makes the natural contrasts of the wood shine – this later creates wonderful, three-dimensional motifs in the room.
Further Information Sources
If you want to read more deeply into the subject, here are some valuable resources:
- Safe handling of wood dust: The information from the BG Bau (German construction industry employers’ liability insurance association) will help you protect your health while sanding.
- Expert knowledge on woodworking: On platforms like Holzwerken.net, you will find many tips on dealing with historical woods and natural surface treatments.
Take your time with this project. The effort is worth it when the old oak beams finally shape your living space as an impressive testament to the past.