Sometimes it’s the everyday coincidences that give the decisive push for a new building project. During a bike ride through the neighborhood, Elisabeth recently noticed a small doll wardrobe that had been left outside a garden gate to be given away. The good piece was made of solid spruce wood and was completely untreated. At first, we just rode on, but the seed had already been planted. The next day, the wardrobe was sitting on my table, along with the request to spruce it up a bit, add small feet underneath, and generally look over the construction so that it shines in its full glory again.
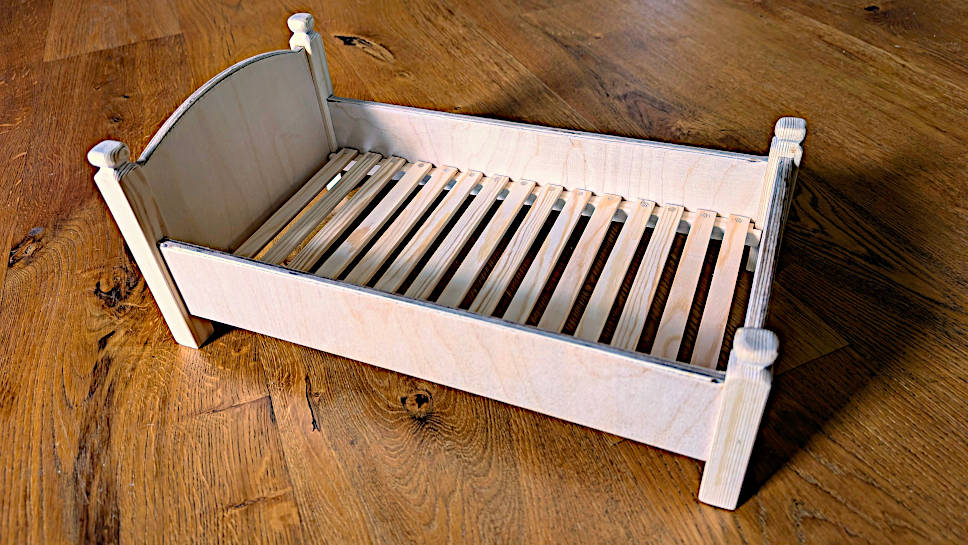
A little later, the question arose whether I could perhaps build a matching doll bed to go with it. Because if my granddaughter Alva’s favorite doll already has her own freshly spruced-up wardrobe, then a proper little bed for sleeping is, of course, an absolute must. The thought matured in my head for a few days before I sat down at my desk to sketch out a first draft. In this post, I want to show you how you can build such a doll bed yourself, what to look out for with the materials, and how small details can enormously enhance the finished piece.
The Planning: Dimensions, Proportions, and Clever Storage
To match the wardrobe, the bed should, of course, also primarily consist of spruce so that the look in the children’s room remains harmonious. However, I quickly decided to make the wide “boards” for the headboard, footboard, and side panels out of multiplex scraps. The reason for this is pragmatic: My large jointer and thickness planer is located in my workshop in Romania. But since I wanted to finish the “order” for the little bed quickly here on site and needed the material immediately, the scrap box literally offered itself. Multiplex is extremely stable, doesn’t warp, and is excellent to work with.
My first doll bed, then. Where do you start? Size and format are the absolute basis of any furniture construction. I know my granddaughter’s favorite doll; it isn’t too big. On the other hand, the bed should at least fit the size of the wardrobe relative to it and not look out of place. When looking at the two pieces of furniture, I had an idea: It would be great if you could stand the bed upright in the wardrobe when it’s not being used. That way, it’s super easy to tidy up, everything is in one place, and it takes up less space in the children’s room when it’s not being played with.
So I took another close look at the wardrobe and measured it. Inside, it is divided into two sections: On the left is a shelving area with shelves, and on the right is a continuous clothes rail. The bed would fit wonderfully upright right into this right-hand section. This clearly defined the maximum dimensions of the project. The bed can be a maximum of as long as fits upright in the wardrobe, a maximum of as wide as the clothes rail area, and a maximum of as deep so that the wardrobe door can still close without any problems at the end.
Normally, a classic doll bed is twice as long as it is wide – that’s a traditional dimension I picked up somewhere. The inside height of the wardrobe fits the width of the area quite well, so that dimension was already fixed. The depth of the wardrobe – or rather, the height of the headboard – is a matter of taste and gave me some leeway. I thought to myself, if the head end is as high as possible, then the bed will also stand stably in the wardrobe later when stored upright. A simple, flat frame, like most current and modern beds, was out of the question for me anyway, as it wouldn’t have matched the wardrobe stylistically.
The Design: Inspiration from Tradition and Going Metal-Free
Ultimately, the memory of an old farmhouse bed provided the decisive impulse for the design. I planned to round off the top edges of the head and footboards to bring some more geometric and soft shapes into play. It was clear from the start that I would also alter and decorate the tops of the bedposts somehow. Especially with wooden toys, such small, handcrafted details enormously enhance the overall appearance and distinguish a self-built piece of furniture from mass-produced plastic goods.
A second – and for me, very important – point in the construction: I want to completely avoid metal in this project. No screws, no nails, no hidden brackets. This naturally limits the connection options in woodworking quite a bit and requires a little more manual precision. Ultimately, I decided on classic glue joints. To ensure these connections survive the sometimes rough everyday play of a toddler and are truly stable, I planned to route grooves into the bedposts for the boards. A grooved wood connection offers a massive amount of gluing surface and mechanical stability that a simple butt joint could never achieve.
Most doll beds you see in stores simply have a continuous, thin plywood sheet as a mattress base. This is probably done to increase the stability of the frame with little material and labor, perhaps also as simple protection against injuries. However, I am rather detail-oriented in the workshop and want to recreate a slatted frame. So, my path first led me to the hardware store to see what the molding aisle had to offer for my plan.
The Material and Tool List
You don’t need much to build this, but you do need the right materials. Here is my final shopping and scrap list for this project:
- Spruce molding 20 x 20 mm (1 piece for the four solid bedposts)
- Spruce molding 12 x 12 mm (1 piece for the side support rails of the slatted frame)
- Spruce moldings 15 x 5 mm (3 pieces, for the actual slats of the frame)
- Wooden dowel rod, 5 mm diameter (for doweling the frame)
- Multiplex scraps, 9 mm thick (for the long side panels and the head and footboards)
- Fish glue (ecological, non-toxic, and with a wonderfully long open time)
- Superglue (as a temporary assembly aid, irreplaceable for small parts)
- Some high-quality foam for the mattress
You should have the following tools ready to be able to carry out all steps precisely:
- Table saw or a good Japanese pull saw for precise cuts
- Router with a 6 mm straight bit, a 9-degree chamfer bit, and a 2 mm round-over bit
- Circle cutting jig for the router (you can easily build one yourself)
- Drill or cordless screwdriver with a sharp 5 mm wood drill bit
- Chisel (5 mm wide, freshly sharpened)
- Sanding block and high-quality sandpaper (80, 120, 180, and 240 grit)
- Several bar clamps (enough to press the bed frame evenly)
- A precise try square and a tape measure
Step 1: Routing the Perfect Curves for the Headboard and Footboard
First, I tried to get an aesthetic view of the height of the head and footboard, the height of the side parts, and the length of the “feet” with a few pencil sketches. Ultimately, the actual feet under the frame ended up being 30 mm high. The height of the side boards should, of course, depend on the height of the mattress, minus the space for the slatted frame and the support rail underneath. A dimension of 60 mm seemed visually and practically optimal here. Because I wanted to decorate the tops of the posts somehow, I set the molding thickness (20 mm) as the upward overhang, thus determining the total height of the head and footboards.
Because it is very difficult to route a curve exactly to the sharp outer edges and then fit these ends cleanly and without a gap into the grooves of the posts, I decided not to extend the curve all the way to the outside. I wanted a gentle elevation of 20 mm in the center of the board – an arch that is as high at its peak as the straight outer bedposts. Mathematically, this resulted in a routing radius of exactly 212.5 mm. Some time ago, I built a circle cutting jig for my router, with which I can easily and precisely recreate such large radii.
The radius of 212.5 mm is, of course, significantly larger than the 90 mm and 125 mm height of the head and footboards. But since I was using parts from the scrap box anyway, this was secondary at first. The only important thing with this routing technique is that your scraps have a minimum height of about 22 to 23 cm so that the compass pivot point still rests safely on the material and doesn’t hit thin air.
I picked out two suitable multiplex scraps and first cut them to the final width of 196 mm. Then I measured the center at the bottom edge and drilled a 5 mm hole 1 cm from the bottom edge. That’s the size of the pin on my circle cutting jig. I set it to the 212 mm radius and lightly scratched the desired arch onto the wood with the router bit. Where this scribed arc touched the side edge, I drew a vertical line, exactly 15 mm parallel to the side edge – on both sides of the board.
Then I routed out the circular arch in several passes. I only routed up to my vertical line on the left and right. I did this on both boards (head and foot). Then, using the try square, I extended the point where the routed arc met the vertical line outwards and finished the upper, horizontal end of both boards by hand with the Japanese saw. The important thing here is that both outer supports are exactly the same height. If it didn’t turn out perfectly even during routing, simply take the lower side as a reference and adjust the other side with the sanding block. The top side is now shaped, but both parts are still too long at the bottom. I’ll set them aside anyway; the final height cut will be made once the grooves in the posts are finished.
Step 2: Routing Perfectly Fitting Grooves into the Bedposts
Next, I cut the four bedposts to the correct length and route the grooves that will later hold the boards. I chucked a 6 mm straight bit into the router. Since the multiplex is 9 mm thick, I have to route the groove in at least two laterally offset passes. I chose 6 mm as the routing depth into the wood. If I went deeper into the wood, the side panels inside the narrow 20×20 mm post would collide with the head and footboards because the cut grooves would overlap.
Let’s do a quick calculation: The posts are 20 mm thick, the multiplex boards 9 mm. That leaves 11 mm of material on the post. So I attached the router edge guide about 5.5 mm away from the outer cutting edge of the bit. On this guide, I clamped small blocks of wood on the left and right as stop blocks so that I wouldn’t route too far with the machine. Then I pressed the post against the right stop and the edge guide, plunging it slowly and in a controlled manner into the spinning bit. Afterward, I pulled the workpiece to the left stop and lifted the post vertically back out. You can usually do two cuts (on two adjacent sides for a corner) this way, then you have to rebuild the setup.
This pencil mark becomes very important during the second pass when routing the final groove width. If you can read the number normally when inserting the piece (i.e., it’s not upside down), then you have the exact same routing direction as before. When readjusting, I initially left the edge guide as it was and only changed the stop blocks for the different board lengths. Here, too, it makes sense to make a small pencil mark on the edge guide and add a short note about which cut it currently is. That way, you don’t have to painstakingly remeasure for the second pass. Next, I moved the edge guide back by 3 mm and repeated all the cuts a second time to achieve exactly the 9 mm groove width for the multiplex.
After the grooves are cleanly routed, manual work comes into play: I take a 5 mm chisel and square off the rounded ends of the routed groove. You could theoretically also round the corners of the boards, but there is another point of material in the corner area of the post that has to be removed with the chisel anyway so that the inserted boards will fit.
Only now, when the grooves are finally finished and chiseled out, do I cut the multiplex parts for the headboard, footboard, and side panels to their final height. If you mismeasured by a millimeter when routing the grooves, you can still easily adjust it on the board now – the parts will just end up a millimeter or two taller or shorter. For me, everything fit right away. I still cut the multiplex boards with a very minimal oversize and then manually adjust them over and over with the sanding block until they slide into the groove snugly and without wobbling.
Step 3: Decorations, Sanding, and Final Assembly
So far, so good. Before the final sanding and permanent gluing, I took care of the visible post ends to give the bed that traditional, handcrafted look. Using a 90-degree chamfer bit, I routed a notch all the way around. I clamped the four pieces of wood and an additional sacrificial board tightly together with a clamp into a single block to prevent annoying tear-out, and guided them across the router table together. Then I rotated the individual strips by 90 degrees, clamped them back together, and routed again. I repeated the same process afterward with a round-over bit for the top edge. I worked out the rest of the soft shaping on the post heads classically by hand with a sanding block and 120-grit paper.
An important aspect of children’s toys is safety: There must be no sharp edges. Therefore, I also slightly broke the top edges of the hard multiplex parts with a 2 mm round-over bit. It is absolutely crucial here not to route all the way to the outside edge, as the groove in the post is now square and otherwise, unsightly gaps and hollows would appear. After that, everything is sanded. I work my way up from 120 and 180 grit to 240 grit so that the spruce wood becomes absolutely silky smooth and no one gets a splinter later.
Now for the nitty-gritty: the gluing. First, I connect the headboard to its two posts, then separately the footboard, and finally, I assemble the whole bed frame with the long side panels. I like to use fish glue for this. Not only is it completely ecological and non-toxic (important for toys!), but it also has the huge advantage of a significantly longer working time (“open time”) compared to normal, fast-drying PVA wood glue. This takes the stress out of assembly. Another advantage: Squeezed-out fish glue can easily be wiped away completely with a damp cloth without leaving spots during the surface treatment later. While the glue slowly sets, you must clamp the parts very well with bar clamps and absolutely check for squareness by measuring across the diagonals with a tape measure. If both diagonals are exactly the same length, the bed is perfectly square.
Step 4: Constructing a Real, Sturdy Slatted Frame
Stop – that reminds me, I forgot something during the initial planning: When I dry-fitted the bed frame together for the first time without glue, I measured the inner distance and preemptively cut the narrow slats for the slatted frame 2 mm shorter than the inside width so they wouldn’t bind later. Since I had never built such a fine miniature slatted frame before, I looked for an appropriate visual spacing and, after some trial and error, settled on a 10 mm gap.
I laid this out on the workbench as a test and realized that the three hardware store moldings I had bought weren’t quite enough in total. But I didn’t want to get back in the car and drive to the hardware store for half a slat. So, without further ado, I slightly shortened the multiplex side panels of the bed. This way, the three whole slats worked out perfectly in the end. Because of this, the exterior dimensions of my little bed no longer match the golden 2:1 ratio exactly, but it still looks absolutely harmonious.
While the finished bed frame stood tightly clamped in the corner to let the glue cure, I focused on the slatted frame. I cut the two bottom support rails (12 x 12 mm) 2 mm shorter than the inside of the bed and notched the ends for the inner bedposts so that the rails could sit flush against the multiplex side panels.
Then I measured the center of one of the support rails and placed the first slat dead center on top of it. Here is a workshop trick for delicate work: A drop of superglue on the underside and then aligned squarely with the try square – this forms the solid foundation for the entire rest of the slatted frame. I actually only intended to do this to test the temporary fit, but it worked surprisingly well and sturdily.
When cutting the many small slats for the slatted frame, only three short scrap pieces of about 3 cm in length were left over. I glued two of them together with a drop of superglue and used this construct as a 10 mm spacer between the slats: Just apply a drop of superglue to the end of the slat to be laid. Wedge the spacer in between, quickly check for squareness with the square, place it leaving a 1 mm gap from the rail edge, and press firmly for 2 to 3 seconds. The slat is instantly secured but could be removed and corrected again if a mistake is made.
Why did I initially only glue the slats to the support rail on one side? Quite simply: Because I want to set the width spacing absolutely precisely while it’s installed in the bed. Once the fish glue on the bed frame has fully cured, I take the support rail with the slats attached to one side and clamp it tightly and flush with the side panel at the bottom of the bed frame. Then I apply a drop of superglue to each of the loose ends of the middle and two outer slats. Now I slide the second support rail up along the opposite side panel until it makes contact with the three prepared slats and glues into place. This way, I matched the inner width of the bed perfectly and without tension, even if the bed happens to bow out by a millimeter in the middle. The remaining slats now also get a drop of superglue and are fixed onto both support rails, ready for the crucial next step.
The superglue holds excellently for now, but it is highly brittle and will break under sustained stress. Now I mark clean drilling points on the ends of the slats and use the 5 mm wood drill bit to drill a blind hole through each slat and about two-thirds of the way into the support rails below. I had previously cut the 5 mm hardware store dowel rod into many small 2 cm pieces using the Japanese saw. I put a little fish glue into the blind hole and around the bottom of the wooden dowel, then gently tap it into the hole with a small hammer. When the glue has fully set, I trim the protruding dowels flush and sand the entire slatted frame cleanly one more time. Finally, the finished frame is glued into the bed frame. The woodwork on the doll bed is now successfully completed!
Elisabeth will take care of the surface finish with ecological, transparent toy varnish.
Doll Bed Mattress and Surface Finish
Of course, such a sturdy bed also needs a mattress. I still had a scrap piece of high-quality foam at home in the basement. I cut it to size to fit the inside dimensions. Unfortunately, at 5 cm thick, the material was visually far too bulky for the small bed. The mattress would have almost towered over the side panels. Therefore, I had to halve the thickness of the mattress to about 2.5 cm, which is often difficult with foam.
To do this, you just guide the counter-rotating blades of the electric knife slowly and completely without pressure along a line drawn on the side, and you get fantastic, clean cutting results. I know this trick from way back: I used to reupholster the seats of my motorcycles myself with new foam, and I picked up an old electric knife at a flea market for just a few bucks specifically for this purpose. It works a thousand times better than any sharp utility knife!
As for the wood’s surface: I wouldn’t leave a children’s toy like this untreated. Usually, I rely on natural linseed oil or beeswax, which absorbs deep into the pores and enhances the wood’s grain. For children’s toys, I prefer to use a special ecological toy varnish.
Now Elisabeth just has to get some nice fabric and sew matching bedding. I already put together a temporary cover for the little mattress from a piece of fitted sheet using fabric glue. Then Alva’s favorite doll can finally move into her new, metal-free little bed in style. The proportions are right, the wood joints are absolutely solid, and the bed can be excellently stored away in the wardrobe. I hope you have a lot of fun building this in your own workshop!