When I took over my old farmhouse in 2016, whose foundation walls date back to 1888, I faced a massive structural task. An old house is a legacy of craftsmanship. Unfortunately, previous owners over the past decades didn’t always make the best decisions for the old masonry. Often, a gray, extremely hard, and cracked cement web glares at you on the facade, wrapping around the beautiful, irregular natural stones like a rigid cage.
I was lucky insofar as the previous owners intervened very little. The rubble stone walls were deeply washed out in many places, allowing rainwater to penetrate unhindered. I wanted to repoint the rubble stone masonry; lime mortar was the historically correct choice for this. In this post, I am taking you along to my construction site and sharing my joint restoration with you. You will learn not only how to proceed with the craftsmanship, but also why modern building materials often cause catastrophic damage to old houses.
Building Physics: Why Historic Buildings Must Breathe
We are accustomed nowadays to packing buildings absolutely airtight and watertight. Plastic foils, synthetic resin plasters, expanding foam, silicone, and high-strength cement dominate modern construction sites. However, if you apply this logic to a building constructed in the 19th century, you initiate its structural decay. The Saxon farmhouse is designed as a completely vapor-permeable system. It must be able to breathe.
From the ground floor up, my house was built mainly with field-fired bricks, which were originally laid with clay. For the current renovation of the wall surfaces, however, I rely on lime plaster, as it is more durable and optimally protects the historic fabric. The underlying foundation, the massive rubble stone base, follows the same physical rules. Moisture that penetrates the masonry in the form of driving rain or rising damp must be able to evaporate unhindered back into the ambient air.
The mortar in historic masonry was very consciously intended by the old master builders as a sacrificial plaster or sacrificial joint. It is always better, significantly more resource-efficient, and incomparably cheaper if a joint becomes slightly crumbly and has to be replaced after fifty or more years, than if the natural stone is destroyed from the inside out by frost shattering. Cement traps the moisture mercilessly. The natural stone absorbs the water when it rains, but the cement in the joints blocks its way out. If temperatures drop below freezing in winter, the water trapped in the stone expands by about nine percent. The enormous pressure shatters even the hardest natural stone. The cracks do not appear in the cement; rather, the cement tears the stone to pieces.
Material Science: Which Lime Mortar is the Right One?
When you want to repoint the rubble stone masonry and use lime mortar, you often face a big problem at the building supply store. In a standard hardware store, you will usually only find pure cement or plaster and masonry mortars with a high cement content. Even products advertised in large letters as lime-cement mortar or trass-cement mortar are completely unsuitable for this project on the historic base, because their cement content still makes them too rigid and impermeable to water.
Natural Hydraulic Lime (NHL)
For the restoration of my old farmhouse, I need natural hydraulic lime, abbreviated in technical jargon as NHL. This special lime not only sets through the slow absorption of carbon dioxide from the air, but it also has hydraulic properties due to natural mineral admixtures in the limestone. This means it also sets chemically under the influence of water, thereby achieving a higher strength and weather resistance, which is necessary for outdoor areas.
The number “3.5” in the designation NHL 3.5 indicates the compressive strength of the material after 28 days. There are essentially three gradations on the market:
- NHL 2: A very soft lime. It is suitable for very soft historic stones like tuff or heavily sanding sandstones. It is too soft for the extremely weathered base area.
- NHL 3.5: Medium strength. This is the standard when you want to repoint rubble stone masonry. Lime mortar of this grade is strong enough to withstand wind, driving rain, and frost, but remains capillary-active enough to protect and dehumidify the natural stone.
- NHL 5: A very hard lime. It is used for extreme static loads or highly water-stressed areas like quay walls. It is too hard for a farmhouse.
The Right Sand: Sharp and Washed
The lime is merely the binder. The true backbone and volume of the mortar is formed by the sand. For the restoration, you should use pure, washed, and above all, sharp sand. Sharp in this construction context means that the individual grains of sand have broken, rough, and angular edges. These sharp edges interlock much better in the mortar bed and ensure enormous crack resistance and stability of the finished joint.
The grain size of 0–4 millimeters is absolutely ideal for historic, usually somewhat wider and deeper joints. The fine particles ensure a creamy workability, while the larger grains give the mortar its necessary structure, compressive strength, and insensitivity to deep shrinkage cracks.
Calculating Material Requirements and Preparation
Before starting to rake out the joints, you must order the material. With large base areas, it is extremely easy to miscalculate. The deep cavities in the irregular rubble stone often swallow up unbelievable amounts of mortar. Do not assume a standardized joint width. Measure the average depth and width of the joints at various points on the facade.
My tip: For heavily washed-out rubble stone masonry, you can certainly expect to need 15 to 25 liters of finished mortar per square meter of wall surface. With a traditional mixing ratio of 1:3, you will need about 25 liters of lime and 75 liters of sand for 100 liters of finished mortar. It is best to order the sand in bulk by the cubic meter from the local gravel pit. This is many times cheaper than bagged goods from the hardware store.
Tools and Occupational Safety
Lime is highly alkaline when wet. This means it is highly corrosive to the skin and mucous membranes. Never work without personal protective equipment when mixing and repointing. You need:
- Respiratory mask for mixing the dry lime powder
- Tight-fitting safety goggles
- Acid-resistant, long masonry gloves
- Lump hammer and various pointing trowels in different widths
- A hawk (or mortar board)
- Several wire brushes and a masonry brush (Quast)
- A garden hose with a fine spray nozzle
- Plenty of jute sacks for hanging over the wall later
Rubble Stone Joint Restoration Guide: The Steps
Now it’s time for the actual craftsmanship. Take plenty of time for each of these steps. Haste and hurry always backfire with restoration work. A conscientious approach is essential when repointing rubble stone masonry for the long term; lime mortar does not forgive sloppy preparation.
Step 1: Thoroughly Raking Out the Crumbly Joint Compound
This step requires the greatest physical effort. You must completely remove the old, crumbling joints or the unsuitable cement. Grab a pointing trowel and the lump hammer. The most important basic rule in masonry for this step is: The joint must be raked out at least twice as deep as it is wide. So if your joint between the rubble stones is 2 centimeters wide, you absolutely must remove the old material to a depth of at least 4 centimeters. Only in this way do you create a sufficiently large flank surface for the new mortar to hold onto.
Deep inside the wall, you will often find the old clay mortar, now crumbled to sand, with which the stones were originally set. Really scrape out everything that is loose. With extremely stubborn cement, you must be careful. Do not strike the cement blindly, so as not to chip off the edges of the natural stones. But anything that has cracks or sounds hollow when tapped must go.
Step 2: Meticulous Cleaning of the Cavities
When you are done with the raking out, the big cleanup begins. Fine dust, cobwebs, and loose sand are enemies of the new lime mortar. They act like a separating layer on the stone.
In the first pass, take a hard wire brush and work the stone flanks inside the joint intensively. Then take the wet masonry brush and sweep out the joints meticulously. On very dry days, I have achieved excellent results by blowing out the joints with an air compressor.
Step 3: Intensively Pre-Wetting the Masonry
This is the single step that is most frequently forgotten. Natural stone and historic masonry are usually extremely dry inside. If you now press the freshly mixed mortar into it, the stone sucks the water out of the mortar. This process is known as “burning out” (or rapid desiccation). The lime mortar then lacks the water needed for the chemical setting process. It does not harden, but becomes chalky and crumbles back to sand after a few weeks.
Therefore, you must pre-wet the masonry intensively and deeply. Use the garden hose with a fine spray wand for this. The joints must be dark with moisture. However, during the actual repointing, there should be no standing water gleaming in the joint anymore. The masonry must have reached a damp, matte state.
Step 4: Mixing the Lime Mortar Correctly
The classic mixing ratio for our pointing mortar is 1 part by volume of NHL 3.5 to 3 parts by volume of the washed, sharp sand (0–4 mm). First, mix the dry ingredients thoroughly in the bucket without adding water until a completely homogeneous mass is formed. Only then do you very carefully add clean mixing water while stirring continuously.
Use the water sparingly. A good pointing mortar must under no circumstances be wet or soupy. It should have a consistency that is described as earth-moist to stiffly plastic. If you form a handful of the mortar, it should hold together stably like a firm snowball. Let the finished mixture mature in the bucket for a few minutes after the first mixing, and then stir it vigorously again before use.
Step 5: Professionally Repointing the Masonry
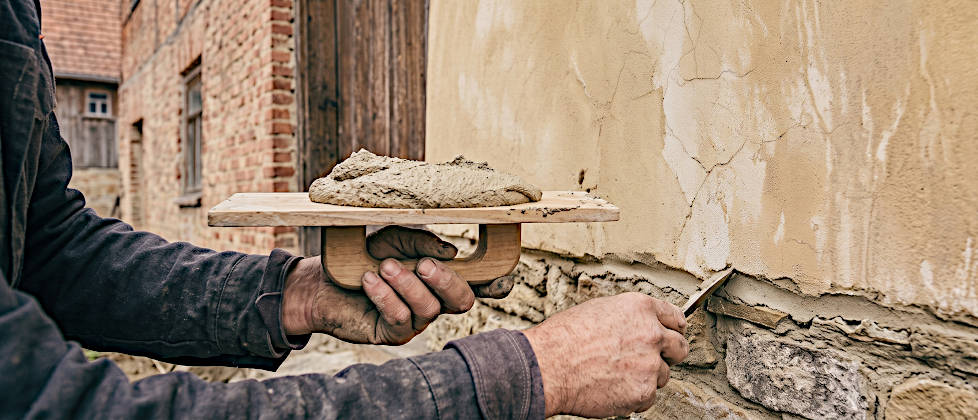
Take the hawk and heap some mortar onto it. Hold this board horizontally directly under the joint you want to fill. Using the pointing trowel, now push the mortar in portions and with pressure off the board deep into the joint. Start at the deepest holes and work your way slowly outwards.
If you have extremely deep breakouts in the wall, you should not try to fill these huge volumes in a single operation. Instead, apply a first thick layer, press it in firmly, and wait a day or two for this base layer to set before building up the rest of the joint flush.
Step 6: Compacting and Setting Pinning Stones
Simply pushing the mortar in is nowhere near enough. You have to compact the material. Press firmly and repeatedly against the freshly applied mortar with the flat tip of the pointing trowel. You will immediately notice how the sandy mass settles and becomes extremely compact. This ensures that no cavities form.
My tip: Especially with historic rubble stone masonry, there are often large gaps gaping between the stones. Here you should work with pinning stones (or spalls). These are small fragments of natural stone that are pressed deep into the joints together with the mortar. This saves material, enormously increases the static stability of the wall, and reduces the risk of shrinkage cracks during curing.
Step 7: The Perfect Surface Finish
The design of the joint is important. In restorations, I prefer to let the joint recess slightly (about 2 to 5 millimeters behind the foremost stone edge). This gives the wall a sculptural depth. The joint must always be shaped in such a way that rainwater can drain outwards unhindered.
As soon as the mortar has set after one to two hours, I finish the surface. Smoothing it flat with the pointing trowel leads to a shiny surface that often looks unnatural. It is better to gently dab the slightly set joint with a dry radiator brush or a fine wooden brush. By doing this, you deliberately expose the top grains of sand. The result is a rough, matte texture that underscores the historical character and provides an excellent evaporation zone.
Troubleshooting and Proper Aftercare
Even if you follow the instructions meticulously, small problems can occur. If the mortar forms fine cracks, the sand was often too fine or the mortar too wet. You can close light hairline cracks during the setting phase by pressing firmly again.
The absolute biggest mistake you can make is to leave the painstakingly repointed wall exposed to the sun without protection. Natural hydraulic lime needs sufficient time and, above all, moisture to set stably. The fresh joints must be kept constantly moist over a period of at least three days.
Spray the masonry regularly with a fine water mist. In warm weather, I advise hanging the masonry with wet jute sacks. These store the water for a long time and release it to the wall as a humid microclimate. The fresh mortar must also absolutely be protected from frost, which is why I ideally carry out this work in spring or early autumn.
Further Information Sources for Historic Building Materials
If you want to read deeper into the subject of restoration, there are some excellent contact points that provide well-founded background knowledge:
- WTA Data Sheets: Here you will find scientifically backed guidelines for the renovation of historic building fabric.
- Interessengemeinschaft Bauernhaus e.V. (IgB): An active association dedicated to the preservation of rural building culture.
- Your local specialist dealer for natural building materials: An irreplaceable source for first-class advice and genuine ecological materials.
When you remove the moist jute sacks after a few intensive days of care, the cleaned masonry has slowly dried, and the rough structure of the new lime joint nestles harmoniously against the irregular flanks of the natural stones, you will see that the effort was worth it. You have not only given the house back its original character, but also secured its structural health for generations.