Sandblasting or Sanding Old Wooden Beams?

Aufnahme eines handgehauenen Eichenbalkens mit deutlichem Vorher-Nachher-Kontrast nach der Reinigung.

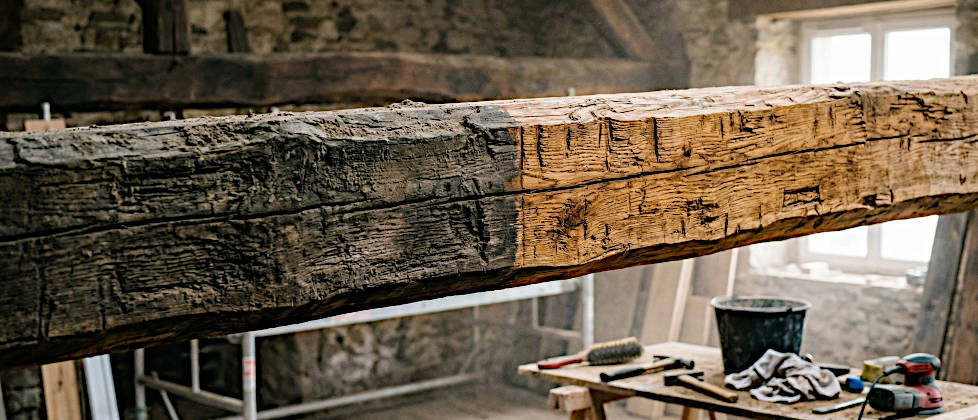
When exposing old, hand-hewn oak beams in your home, you often face a major challenge: the beams have darkened significantly over the decades or centuries, they have often been painted – at best with easily removable limewash, at worst with stubborn oil paint – or they are simply extremely dusty. To fully bring out the rustic character of the hand-hewn beams indoors, they must be cleaned.

But which method is the right one for hand-hewn oak beams? In this article, I compare the most common approaches: low-pressure sandblasting, dry ice blasting, and mechanical sanding using a brush sander or a wire brush attachment for a drill or angle grinder.

Preparation: Safety and Preliminary Work

Before you choose a method, there are steps and safety precautions that are absolutely essential. Old beams are often full of surprises and carry hidden risks.

Important Health Warning: Oak Wood Dust

Oak wood is beautiful, but its sanding dust is extremely dangerous and is considered carcinogenic. When sanding or blasting oak beams indoors, professional respiratory protection (at least an FFP3 mask) is absolutely mandatory. You must ensure powerful dust extraction (dust class M or H) and completely seal off adjacent living spaces to avoid endangering your health and that of your family.

My practical tip: Meticulously examine the wood for old, hand-forged nails, screws, or staples. A metal detector, more precisely a so-called pinpointer, does a great job here. Personally, I use the Garrett Pro-Pointer 2 for this task. Thanks to its handy shape, you can scan the beams centimeter by centimeter and accurately locate even deeply embedded metal parts that are often invisible from the outside.

Since it is extremely time-consuming to put down the tool after every find to pull the nail, I work in stages: Find the metal piece, make it visible, and simply mark the spot with a dot of spray paint. This way, you can complete the entire search first. In the second step, you take the tool and remove or countersink all marked nails in one go. In the third step, do a quick final check with the pinpointer. The sprayed paint will simply be removed during the subsequent cleaning (sanding or blasting) anyway. Take this preparation seriously: an overlooked nail can not only ruin your brush sander immediately, but it can also cause dangerous sparks or unsightly rust marks during blasting.

The Comparison: Blasting, Brush Sander, and Wire Brush

Hand-hewn wood is characterized by its uneven, wavy surface – the so-called axe marks. This is exactly the structure you want to preserve.

Method 1: The Brush Sander (Burnishing Machine)

A brush sander with a nylon or brass brush is an excellent choice for DIY enthusiasts. The rotating brush adapts well to the unevenness of the hand-hewn wood without changing its basic shape. This gives you very good control over the material removal.

Method 2: The Wire Brush (for Drill or Angle Grinder)

A very popular and inexpensive variant is the use of wire brush attachments (cup or wheel brushes) for the drill or angle grinder. This method is significantly more abrasive than the standard brush sander. This is particularly advantageous if you need to remove stubborn oil paint. In addition, narrow wire brushes are excellent for reaching into large cracks and deep joints in the wood. But beware: the rotating wire bristles can be extremely aggressive and leave deep grooves in the wood if too much pressure is applied.

Method 3: Low-Pressure Blasting

In low-pressure blasting, a fine abrasive (such as glass beads, walnut shells, or special sand) is blown onto the wood with relatively low pressure. This method cleans deep into the tightest crevices and wormholes that you would never reach with a brush. The result is often very uniform.

Method 4: Dry Ice Blasting

A particularly gentle premium alternative is dry ice blasting. Here, frozen CO2 pellets are shot at the wood, blasting away dirt or stubborn oil paint upon impact, and then immediately dissolving into gas. No abrasive is left behind, only the removed dirt. This method is extremely gentle on the historical wood structure, but usually more expensive as it is almost always carried out by professionals.

Cost-Benefit Comparison & Important Warning Regarding Patina

Mechanical Sanding (Brush Sander & Wire Brush): Lower initial costs (approx. 100 to 300 euros, wire brush attachments are even cheaper), ideal for smaller areas and individual rooms. Good for limewash, but soft brushes smear quickly with tough oil paint, which is where the wire brush shows its strengths. However, the time required is enormous, and the work is very physically demanding.

Low-Pressure & Dry Ice Blasting: High costs for renting a compressor and blasting equipment or hiring a specialist company. However, these methods save an extreme amount of time for large areas and thick layers of paint.

Warning: Proceed carefully with all methods! Too aggressive removal (especially with coarse wire brushes) destroys the historical patina and the unique axe marks of the oak beams. Once sanded away, this historical character is irretrievably lost.

Step-by-Step to the Perfect Beam Look

To ensure your project is a success, you should proceed systematically:

  1. Remove nails from the beams: Pull all metal parts with pincers or a crowbar. If they are stuck too tightly, drive them deep into the wood with a punch.
  2. Choose a method: Weigh up whether to use a brush sander, a wire brush, or a blasting method based on the room size, your budget, and the coating (limewash vs. oil paint).
  3. Install dust extraction and protection: All methods generate immense amounts of dust. When sanding, a strong industrial vacuum cleaner connected directly to the machine is mandatory. When blasting, you must completely cover the room with plastic sheeting and create negative pressure. Due to the carcinogenic oak wood dust, wearing an FFP3 respirator mask is absolutely essential!
  4. Surface treatment with boiled linseed oil: Once the wood is cleaned and free of dust, the finish is applied. Paint the oak beams with high-quality boiled linseed oil (Leinöl-Firnis). The oil enhances the grain, protects the wood, and gives it a warm tone. Especially as a photographer, I appreciate how the linseed oil makes the natural contrasts of the wood shine – this later creates wonderful, three-dimensional motifs in the room.

Further Information Sources

If you want to read more deeply into the subject, here are some valuable resources:

  • Safe handling of wood dust: The information from the BG Bau (German construction industry employers’ liability insurance association) will help you protect your health while sanding.
  • Expert knowledge on woodworking: On platforms like Holzwerken.net, you will find many tips on dealing with historical woods and natural surface treatments.

Take your time with this project. The effort is worth it when the old oak beams finally shape your living space as an impressive testament to the past.

Reactivating the Traditional Summer Kitchen: From Ruin to Culinary Centerpiece

Freigelegte Grundmauer und Ruine meiner alten Sommerküche aus Stein und Ziegeln neben meinem Bauernhaus in Siebenbürgen, bereit für die Renovierung.

The thought of standing in a cool, shady outdoor kitchen on a hot July day, while the scent of fresh herbs and roasted food wafts through the garden, is deeply soothing. In the past, the summer kitchen was standard in the countryside – it kept the heat of the stove away from the main house and was the center for preserving the harvest. Today, this place is experiencing a renaissance.

In this post, I will show you how to renovate an old summer kitchen, what practical benefits it offers you today, and what you should consider during the planning phase.

A Look at Transylvania: From Wooden House to Stone Courtyard

To truly understand the origin and necessity of the summer kitchen, it is worth taking a look at the historical construction methods, for example in Transylvania. In the past, pure wooden houses dominated the villages there. Wood was abundantly available in the adjacent Carpathian Mountains and was the logical building material of choice.

However, due to intensive mining, agricultural clearing, and the generally high demand for wood, the forests shrank visibly. In the 18th century, the rulers of the Habsburg Empire – especially Maria Theresa – intervened rigorously. In order to conserve the valuable wood resources and above all to contain the devastating village fires that regularly destroyed wooden houses, the construction of stone houses was heavily promoted and partly made compulsory.

In the course of this, the architecture of the farmsteads changed massively. To minimize the risk of fire and the enormous heat development in the new, massive main house, fire-intensive activities were relocated. Baking, laundry care, and, of course, cooking in the hot months now took place in a separate building. The summer kitchen became a fixed, indispensable component, not only of the Transylvanian Saxon farmstead.

Why Reactivation is Worth It for You

Before you reach for the hammer, it is good to visualize the added value today. A summer kitchen is much more than just a covered barbecue area.

  • Thermal relief: Your residential house stays significantly cooler in the summer, as the oven and stove are operated outside.
  • Odor control: Strong odors from roasting, deep-frying, or preserving dissipate immediately in the fresh air and do not settle in your living spaces.
  • Social center: Cooking transforms from an isolated process in the house kitchen into a communal experience outdoors.
  • Harvest processing: If you grow your own fruit or vegetables, you can wash, clean, and preserve them directly in the garden without carrying the dirt into the house.
My tip: Check the existing connections in your outbuilding beforehand. Often, under old floors or in the walls, there are still water pipes or power connections that can be reactivated by a professional with manageable effort. This saves you high development costs for your project.

Step by Step: Renovating Old Substance

Many old summer kitchens are located in former washhouses or sheds. The building fabric is usually solid but requires attention after years of vacancy.

1. Inventory and Drainage

Often, rising damp is the biggest problem. Check the roof and the floor slab. If you are renewing the floor, ensure a slight slope towards the door – this way, you can easily hose down and clean the room later.

2. The Choice of Surfaces

In a summer kitchen, which is usually not heated in winter, there is fluctuating humidity.

  • Walls: Pure lime plaster or silicate paints are ideal, as they are breathable, regulate moisture, and naturally prevent mold growth.
  • Worktops: Natural stone, polished concrete, or hard-wearing tiles are robust, weatherproof, and easy to clean.

3. Stove and Oven: The Heart

An old, wood-fired kitchen stove exudes pure nostalgia, but is often impractical for a quick coffee. A clever combination of a modern induction hob (for everyday use) and a restored wood-fired oven or barbecue fireplace offers you maximum flexibility.

Equipment and Functionality

To make working in your new old summer kitchen a joy, the ergonomics must be right. Think about short distances between the sink, workspace, and cooking area.

  • Lighting plan: Since you will often sit outside and cook late into mild summer evenings, good, glare-free lighting of the workspaces is essential. Indirect, warm white light also creates the necessary atmosphere when the food is on the table.
  • Storage space: Use open shelving systems made of metal or oiled wood. Closed cupboards in unheated, damp rooms tend to develop musty odors over the winter months.

Further Information and Sources

If you want to delve deeper into the matter, these contact points will help you with your planning:

  • The Renovation Bible: An absolute must for your project is the book „Das sächsische Bauernhaus in Siebenbürgen. Was wie machen an alten Häusern“ by Jan Hülsemann. It is rightfully considered the bible for renovators of Transylvanian farmsteads and provides you with invaluable, practical tips on preserving the historical substance.
  • Building culture and history: You can find more about the historical development of farms and construction methods in Transylvania at the Fortified Churches Foundation (Stiftung Kirchenburgen), which deals intensively with the architectural heritage of the region.
  • Traditional crafts and building materials: A local network is crucial for an authentic renovation in Transylvania. The Mihai Eminescu Trust is strongly committed to preserving the village building culture and often provides contacts to traditional craftsmen (such as clay builders) or sources for historical materials (e.g., hand-molded bricks). Another way is to ask directly in neighboring villages for unused demolition material.
  • Local building law (Romania): The first step for a building permit (Autorizație de construire) leads to the local town hall (Primărie). If your farm is located in a protected zone, the County Directorate for Culture (Direcția Județeană pentru Cultură) must be involved. To reactivate old chimneys, you should also consult a local chimney sweep (Coșar) to meet the current fire protection regulations of the fire brigade (ISU).

Lime mortar for historic buildings: walls, plaster and tadelakt in damp areas

Nahaufnahme einer historischen Naturstein- und Ziegelwand in Siebenbürgen, an der frischer, heller Kalkmörtel für historisches Mauerwerk mit einer Kelle aufgetragen wird. Warmes Nachmittagslicht hebt die poröse Textur hervor.

Renovating a 150-year-old building comes with many challenges. One of the most severe mistakes made with old buildings is the use of modern building materials like cement or synthetic resin-based plasters. These materials seal the historical masonry, trap moisture, and inevitably lead to massive structural damage.

The only professional solution for preserving old building fabric is a return to a traditional binder: lime. In this post, I will show in detail how lime mortar is used for masonry and plastering, and which special techniques are necessary for damp areas such as plinths, garden walls, and even the bathroom (Tadelakt).

Why cement destroys historical buildings: Old bricks and natural stones are soft and capillary-active. Cement mortar is much harder than the stone itself and extremely rigid. During natural settling of the house, the cement does not crack; instead, the historical stone breaks. Furthermore, cement prevents rising dampness from evaporating. The water rises higher and higher into the wall, destroying it from the inside. Lime, on the other hand, is elastic, breathable (vapor-permeable), and acts as a moisture regulator.

1. Lime Mortar for Masonry: Flexibility for Old Stone

When repairing load-bearing walls or laying new historical stones, a pure lime mortar is essential. It adapts to the thermal and static movements of the old house.

  • The mixing ratio: For a classic masonry mortar, mix 1 part lime putty (slaked for at least 12 months) with 3 parts sharp sand (grain size 0-4 mm).
  • Application: Historical bricks and natural stones absorb water extremely quickly. If they are laid dry, they extract the water from the mortar before it can set (it “burns”). Extensive pre-wetting of the stones is therefore absolutely mandatory.
  • The setting process: Pure non-hydraulic lime does not harden by drying out, but by absorbing carbon dioxide (CO2) from the air (carbonation). This process is slow and requires a certain basic moisture.

2. Lime Mortar for Plastering: The Breathing Skin of the Wall

A pure lime plaster is the best insurance against mold. Due to its naturally high pH value (alkaline), it deprives mold spores of any basis for life. Additionally, it absorbs moisture when humidity is high and releases it when the air is dry.

  • Base coat (leveling plaster): Here, coarse sand (0-4 mm) is mixed with lime in a 1:3 ratio. The plaster is thrown onto the wall, not spread, to achieve optimal mechanical interlocking with the deeply raked joints.
  • Top coat (finishing plaster): Fine sand (0-1 mm or 0-2 mm) is used for the visible layer. I pay special attention to the texture here: a slightly uneven lime plaster, rubbed with a sponge float, casts a wonderfully soft light that gives old rooms their true character.

3. Lime Mortar in Damp Areas: Plinths and Garden Walls

Here we reach the limits of normal non-hydraulic lime. Areas permanently exposed to heavy moisture or even splashing water (foundations, the exterior plinth of the house, or freestanding garden walls) require a different approach. Non-hydraulic lime does not set under wet conditions and would be washed away.

The solution is hydraulic lime.

Using Natural Hydraulic Lime (NHL)

NHL (Natural Hydraulic Lime) is burnt from special limestones that naturally contain clay minerals. These clay components ensure that the lime hardens not only through CO2 from the air but also through a chemical reaction with water. It becomes stronger than non-hydraulic lime and is frost- and water-resistant, yet remains breathable and softer than cement.

The Plinth Plaster as a Sacrificial Plaster

In the plinth area, the masonry often draws salt-laden moisture from the ground. Here, a special plinth plaster made of NHL (usually NHL 3.5 or NHL 5) and coarse, open-pored sand is applied. This plaster acts as a “sacrificial plaster”. It allows the water to evaporate while the harmful salts crystallize on the plaster surface. After 10 to 15 years, this plaster becomes saturated, crumbles off, and is renewed. The historical masonry behind it, however, remains intact.

Pozzolans: The Roman Technique for the Garden Wall

If no NHL is available, normal lime putty can be made hydraulic by adding pozzolans (e.g., brick dust from crushed old roof tiles or volcanic trass). The Romans already used this technique for their aqueducts. The brick dust reacts with the lime and makes it waterproof – ideal for the tops of garden walls that are exposed to rain without protection.

4. Tadelakt: Waterproof Lime for Bathroom and Kitchen

The antique Moroccan plastering technique Tadelakt proves that lime can also be highly water-repellent. It is the perfect, seamless alternative to modern tiles in a historical farmhouse.

Tadelakt uses a special, strongly hydraulic shell lime. It is applied in several thin layers. The crucial step is compaction: before the plaster fully hardens, the surface is polished with a smooth semi-precious stone (e.g., agate) under strong pressure in small, circular movements. Finally, pure olive oil soap is applied. The fatty acids of the soap react with the highly alkaline lime to form water-insoluble lime soap.

The result is a fascinating, slightly wavy surface that is waterproof but remains breathable. It is perfectly suited for shower walls or as a splashback in a country kitchen. Visually, Tadelakt offers a depth and liveliness that industrially manufactured tiles can never achieve.


Step-by-Step: Mixing Plinth Plaster for Damp Masonry

Since the plinth area is the most common problem zone in old houses, here is the exact procedure for a breathable renovation plaster based on hydraulic lime.

  1. Preparation and raking joints: Completely remove all old cement plaster from the plinth. Rake out the joints of the historical masonry to a depth of at least 2 to 3 centimeters. Brush the entire surface dry.
  2. Intensive pre-wetting: Wet the masonry intensively with a masonry brush or a fine spray. Ideally, start this the evening before. The stone must be damp, but matte on the surface (not wet and shiny).
  3. Mixing the mortar: Mix the natural hydraulic lime (NHL) with the sand in a ratio of 1:2.5 to 1:3. Add only enough water to create a plastic, well-adhering mass. The mortar must not be too liquid.
  4. Throwing on the plaster: Throw the plaster vigorously onto the wall with the trowel, using a flick of the wrist. This throwing action is absolutely necessary to press the mortar deep into the raked joints. Afterward, only roughly level the plaster and leave the surface rough so it can absorb and release plenty of moisture.
  5. Aftercare: Protect the fresh plinth plaster from direct sunlight and strong wind. Keep it slightly damp for the next 2 to 3 days (mist it regularly) so the hydraulic lime can set optimally.