
Supporting Ceiling Beams in an Old Building: How to Safely Prop Up a Wooden Beam Ceiling
Imagine standing in a room that has survived almost unchanged for well over a hundred years. The air smells of fine dust, dry wood, and the history of generations. That is exactly how I felt when I took over my house from 1888 and grasped the full dimensions of the ground floor for the first time. As I stood in the “Stube” – the living room – and looked up, I saw a ceiling that told a massive history, but also an extremely static one. The massive ceiling beams sagged deeply above the door to the kitchen. In that moment, I realized that I had to do something if I wanted to use the attic in any way. I want to share here how I am approaching this construction project, what concerns I had in the first few days, and what the professionally correct approach looks like when it comes to the demanding topic of supporting ceiling beams in an old building.
The year of construction, 1888, marks the late Gründerzeit era. It was a time when the oak beams here in Transylvania were still hewn with an axe. The cross-sections of the beams in relation to the width of the room severely strained the load-bearing capacity of the material. The Stube was traditionally the largest room on the entire ground floor in these houses to offer space for the large family and guests. Larger rooms, however, inevitably mean a very wide span without supporting partition walls. The planned use of the attic is a blessing and a curse for me in this context. On the one hand, the huge roof space under the tiles offers a fantastic area with enormous potential for diverse uses, even for additional living space. On the other hand, I know that such an expansion means tons of new material and therefore new loads. This includes insulation, new floor constructions, and later possibly furniture as well as the live load itself. However, before I carry even the first board up the stairs, I absolutely must temporarily secure the already heavily strained structure in the living room underneath. If you ever face a similar, awe-inspiring task, this ‘Guide to Securing an Old Farmhouse Wooden Beam Ceiling‘ will help you avoid typical mistakes. Let’s embark on this building physics journey together.
The Anatomy of a Massive Ceiling from the Late Gründerzeit
When I started looking closely at the construction of my 1888 house, one thing quickly became clear to me: you can never compare a historical ceiling with modern standards or even today’s lightweight construction methods. Under the old, often cracked plaster, these constructions hide an extreme dead weight. I opened the ceiling in the living room with a pickaxe to understand what I was dealing with. What I found there deeply impressed me from a craftsmanship perspective, but also gave me worry lines regarding the statics.
The main beams consist of solid oak. This wood was the absolute standard back in the late 19th century because it was regionally available. They spanned my living room over a considerable length of a good six meters. However, between these massive beams, there was no hollow space filled with glass wool, as we know it today. Originally, there was simply a two-layer, staggered layer of boards on top of the beams, on which tamped straw loam was applied as insulation. The loam probably trickled through the joints, which is why the beams were later simply boarded up from below, fitted with a reed mat, and plastered with lime plaster.
This massive construction method fulfilled two absolutely vital functions at the time: it served as excellent fire protection, which prevented a fire on the ground floor from immediately breaking through to the roof truss, and its sheer mass provided excellent insulation. The big disadvantage for me today: such an intact ceiling construction easily weighs between 70 and 120 kilograms per square meter, and that is completely without any additional payloads. In a large room like this living room, the ceiling quickly reaches the total weight of several small cars. This load has rested continuously, day after day, on these wooden beams for almost 140 years. Against this background, it is absolutely no wonder that the beams have visibly bowed downwards over the decades.
Searching for the Causes: Why is my historic ceiling sagging?
So I often stood still for minutes in my living room, staring at the massive sag of about 8 centimeters in the middle. My first, purely emotional reaction involved static concerns. I wondered if the beams were about to break and the entire structure would soon fall on my head. That’s why I started reading up on the mechanics of wood and historical statics. I learned something elemental that has permanently changed my entire perspective on old buildings: wood lives and remembers the loads it has carried.
What I saw on my living room ceiling was the perfectly natural result of a decades-long process that structural engineers refer to as “creeping” or viscoelastic deformation. When a building material like wood is exposed to a permanent, extremely high dead load over generations, the wood fibers deform plastically on a molecular level over the long term. The wood does not break during this process. It elastically yields to the load, bends, and fully hardens in this new, curved shape over the years. As long as the wood remains consistently dry and free of pests, this sag is basically absolutely stable and statically “frozen”. It looks extremely dangerous to the untrained, modern eye, but in reality, it is often a sign that the structural framework is working perfectly with the acting forces and has adapted to them.
But I didn’t want to blindly rely on this theory. I wanted to rule out beyond any doubt that the sag is caused by acute, progressive damage. So I took a long chisel and a carpenter’s hammer and examined the most critical points of the entire structure: the beam ends in the masonry. This is by far the biggest weak point in almost all houses from 1888. The beam ends sit deep in the exterior masonry. If there have been leaks there in the past over a longer period of time – be it from defective roof tiles, constant driving rain on the facade, or simply condensation from heating – the beam ends inevitably rot due to aggressive fungal attacks such as dry rot. Alternatively, they are systematically eaten from the inside by insects like the house longhorn beetle or the deathwatch beetle.
So I tapped the beams. I hit the old wood hard with the hammer. If it sounds bright, hard, and metallic, everything is fine. However, if it sounds dull, soft, and gives hardly any resonance, extreme caution is advised. In my case, however, the findings were unremarkable – lucky me.
I admit, my first impulse was to get two hydraulic truck bottle jacks from the nearest hardware store, place a few thick squared timbers underneath, and simply push the crooked ceiling in the living room straight up again with pure force. I thought to myself: once the ceiling is exactly level again, the living room will look much better, and I can build my new floor up in the attic much more easily. After sleeping on it for a night, I remembered my time in construction long ago – even though I built new buildings then, I only dealt with the renovation of historic structures marginally.
If I had really followed through with my original impulse, I probably would have ruined my 1888 beam ceiling. The old, dried-out, and brittle wood of the long beams would have simply torn open on the lower tension side under the enormous, punctiform pressure of the hydraulics. The tension would have been gone. The sudden lifting of the beam in the center of the room creates a physical leverage effect at the two wall supports. This leverage force would have damaged the historic brick masonry of the exterior wall. The golden rule for old building renovators is always: exclusively secure the current state. Intercept the load exactly where it currently stands to prevent further sagging from the future use in the attic. I will absolutely not force the old house into a modern, perfectly straight corset.
Preparing My Securing Plan
After thoroughly understanding the static principle, I moved on to the concrete planning of the implementation. Interestingly, the biggest manual challenge when temporarily supporting ceiling beams in an old building is not the ceiling itself, but the floor. With every step, you must always keep in mind that the steel building props transfer the massive load of the ceiling downwards at specific points. If you place these props incorrectly, you don’t solve the problem, you just shift it from top to bottom.
In my old living room, I don’t have a solid, modern concrete floor on the ground floor, but historic wooden floorboards. These are nailed to massive oak joists. If you were to place a steel prop with its 10×10 centimeter square base plate directly on these old boards and load it from above, the prop would push through the wood like a punch under the load. In the first step, I located the path of the oak joists under the floorboards. The best way to do this is by looking at the rows of nails.
My Tools and Material Selection
I have learned that when it comes to measures affecting statics, you must never skimp on materials. Forget the thought of cobbling together wobbly props from a few old wooden posts, squared timbers, and crooked wedges. If tons of weight start moving up there during the work, no makeshift wooden wedge in the world will help you. Therefore, I consciously and exclusively opted for professional equipment.
The most important tools on my list were steel building props. I got heavy-duty Class C models for my project. These have a guaranteed load capacity of well over two tons per individual prop, even at maximum extension length. When buying or renting, pay strict attention that the large outer threads run clean, rust-free, and smoothly. The solid locking pins (often G-shaped) must be present.
In addition to the building props, I got thick scaffold planks from the timber trade. These should be at least 45 to 50 millimeters thick and crack-free. I also cut a few sections of solid oak wood in the workshop. In terms of tools, you really only need a very long, precise spirit level. But what made the work massively easier for me was a highly visible cross-line laser level. With this, the absolute plumb of the props in the room can be checked perfectly and in seconds.
My tip: Don’t buy these heavy, bulky building props brand new for a lot of money if you only need them for a single, temporary project. Every well-stocked construction machinery rental company rents out these props for a few cents a day. This saves your renovation budget enormously, and you can be absolutely sure that you are getting regularly maintained, tested professional quality that meets the toughest safety standards.
Ich für mich habe gebrauchte Stützen gekauft, weil ich die über die gesamte Sanierungszeit immer wieder benötige.
(Translation note: Personally, I bought used props because I will need them again and again throughout the entire renovation period.)
Guide to Securing an Old Farmhouse Wooden Beam Ceiling: Step by Step into Practice
When all the materials were finally arranged and ready in the living room, the actual work began. I will now describe step by step how I proceeded so that you can follow this process for your own renovation project. Take your time for this task, work without rushing, send helpers out of the room if they distract you, and stick to the proven sequence.
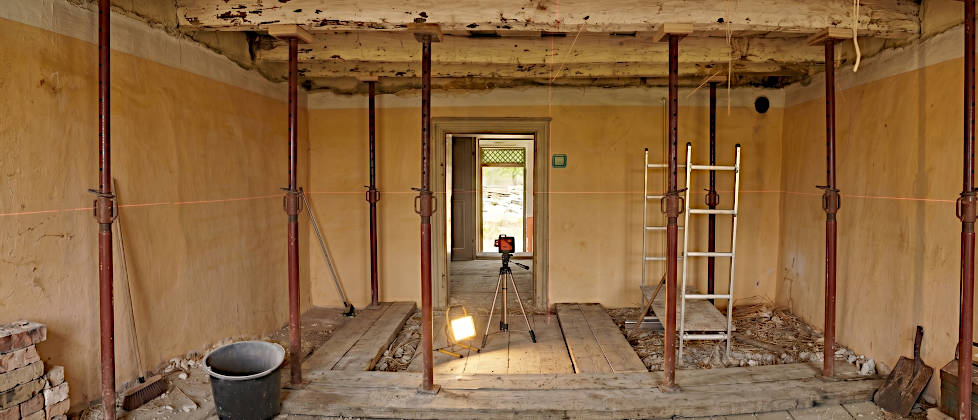
Step 1: Laying out a stable plank on the healthy floor for load distribution
I started at the bottom. After determining the load-bearing points in the living room floor, I laid the scaffold planks flat on the floor. From now on, these planks act as a kind of strip foundation for the props. Physically, they ensure that the point load, which later presses on the small base plate of the prop, is distributed safely over a large area at an angle of about 45 degrees onto the substrate. I made sure that the plank lay completely flat. Because my old floorboards have slight waves due to age, I padded the cavities under the plank with thin strips of plywood until nothing wobbled, bounced, or yielded anymore.
Step 2: Placing adjustable steel building props under the affected beam ends
Now I lifted the first heavy steel prop onto the prepared plank at a distance of about 40 to 50 centimeters from the brick masonry. I pulled the inner tube of the prop upwards until the head plate was just below the ceiling beam, and inserted the solid locking pin through the corresponding hole. Now my cross-line laser came into play: I aligned the prop perfectly plumb on two axes. If a building prop stands crooked, its static load capacity decreases drastically, and it tends to treacherously break away to the side under a sudden load.
Step 3: Inserting a hardwood block between the prop and the ceiling beam
Before I tightened the prop against the wood, I took one of my prepared oak hardwood blocks and placed it exactly in the middle of the prop’s head plate. The resistant hardwood optimally distributes the pressure on the ceiling beam and prevents any damage to the historical surface. In addition, the rough wood-on-wood connection ensures excellent friction resistance. This guarantees that nothing will slip away later, even with slight vibrations in the house.
Step 4: Hand-tightening the props without lever extension
Now the prop is slowly turned upwards until it touches the beam. Then continue turning carefully until you feel a clear, firm resistance. Strictly hand-tight! No pipe wrench, no hammer, no lever extension to try and force another half turn. As soon as the prop can no longer be pushed sideways, the force-fit connection is established. The prop now carries the weight without forcing the beam upwards even a single millimeter.
Step 5: Continuous monitoring of the wall connections for crack formation
After all affected ceiling beams in the room are secured in this way, the actual observation phase begins, lasting for days. Wood works under changed loads, and in an old building, you can almost always hear this through fine cracking, settling, or crunching. Over the next three days, I walked through the living room morning and evening with an extremely bright flashlight and meticulously checked the connections between the beams and the plastered walls. If new hairline cracks had formed there or if plaster had trickled, it would have been a clear sign that I had pre-tensioned the props slightly too tight after all.
From Provisional to Eternity: Permanently Securing the Oak Beams Against Sagging
The goal is clearly defined: the historic ceiling must under no circumstances sag any further after the expansion, it must easily bear the weight of the future attic use, and I want a horizontal, vibration-free level for the floor covering in the attic. In professional old building renovation, there are essentially three proven, recognized methods for this, which I will explain to you in detail here.
Method 1: Side Flitching – The Special Rule for Rock-Hard Wood
Side flitching (also called sistering in carpentry terms) is a structural classic. In this process, the old, sagging ceiling beam is given a new, extremely strong partner made of solid structural timber (KVH) on the left and right (or only on one side). These new beams are aligned exactly horizontally up in the attic so that the old beam no longer dictates the height for a future floor.
With old oak, the connection must instead be made via precisely fitting drill holes. You drill exactly through the new wood and the old oak beam and insert thick, high-strength threaded rods (e.g., M16), supplemented by huge fender washers and heavy nuts. The threaded rods sit absolutely tight in the holes and take on the massive shear forces purely through the precise steel bolt and the extreme friction of the tightly pressed wood halves.
Method 2: Doubling up from above – Utilizing the height statically
Since I don’t need any living space in the attic at the moment anyway, and there is more than enough room height available for the distant future, top-side reinforcement is an extremely efficient option. Instead of flitching the new KVH timber to the side of the old oak, the new material is placed directly on top of the historical ceiling beam (doubled up).
The static principle behind this is ingeniously simple: by placing it on top, the structural cross-section of the beam increases massively in height – and in statics, component height is by far the most important criterion for load-bearing capacity. The old oak beam henceforth primarily takes on the tensile forces in the lower area, while the new, superimposed wood absorbs the compressive forces at the top. Both timbers are connected by special, very long fully threaded screws, which are screwed in diagonally across each other. But the golden rule applies here too: with historical oak, you must pre-drill every centimeter with the exact matching drill diameter. If you don’t do this, the head of the strongest steel screw will simply break off, or the screw thread will seize up red-hot.
Method 3: The Strongback Beam – The invisible suspension structure in the attic
This is my absolute favorite and the structural measure that perfectly suits the conditions of my house. You often see a thick drop beam in a renovated old building – a massive visible crossbeam or steel girder that is screwed under the ceiling and which you constantly bump your head on if ceiling heights are low. The much more elegant solution is to simply move this beam one floor higher: the so-called strongback (or inverted drop beam).
In this process, an extremely resilient beam (either made of massive glulam or a heavy steel profile) is laid across the oak beams up on the floor of the roof truss. It rests absolutely securely on the left and right on the load-bearing exterior or interior brick walls. The sagging oak beams in my living room are now literally “suspended” from this strongback using massive tie rods or heavy steel straps. The strongback does not pull the ceiling beams up by force – after all, we secure them friction-locked in their current state – but it grabs them and holds them immovably and vibration-free in their current position for all time.
The brilliant thing about this solution for my situation: since I have enormous headroom in the attic, this massive strongback will later simply disappear completely into the substructure of the new floor construction if I should ever expand and use the room. No one will ever see it. Down in the living room, the historical ceiling remains visually untouched, I do not lose a centimeter of valuable room height, and above, the statics rest absolutely uncompromisingly and securely on the suspension structure.
My Tip for a Safe Expansion
Anyone who wants to delve deeper into these fascinating construction techniques and traditional wood connections should urgently consult the technical literature. I highly recommend the leaflets of the Scientific-Technical Working Group for Building Preservation and Monument Conservation (WTA) as well as the excellent publications from the Informationsdienst Holz (Wood Information Service) on the repair of timber structures. You can also find invaluable knowledge on historical structures at the Fraunhofer IRB.
Once the sistering up in the attic is finally completed and the load of the future living space is safely transferred to the new timbers, the most beautiful moment of the renovation arrives: loosening and slowly unwinding the steel building props in the living room. If the old house doesn’t creak even faintly when the props are completely removed, doesn’t settle a single millimeter, and simply stands still, then you know exactly that you have done an excellent job, both manually and statically. The house is ready for the next 140 years.