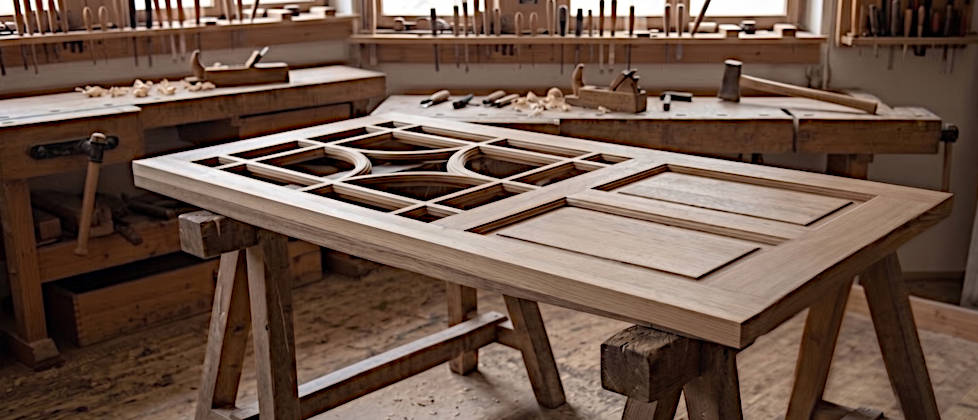
Anyone who has ever opened the massive, handcrafted softwood door of an old Saxon farmhouse knows the feeling. The heavy weight, the deep sound of the falling latch, and the inimitable patina of over a hundred years tell stories that no modern industrial door leaf could ever convey. When restoring historical buildings, I realize time and again: these doors are not just functional elements; they are the soul of the house. They were built by craftsmen who understood their trade from the ground up. But exactly this soul sometimes has a mind of its own. After decades of intensive use, changing temperatures, and the natural aging of the wood, many of these historical doors begin to stick, scrape on the floorboards, or simply no longer close properly.
Unfortunately, the first impulse of many craftsmen and DIY enthusiasts today is often a quick grab for the electric planer. One quick pass along the offending edge, and the door seemingly fits back into the frame. This convenient path, however, irretrievably destroys the historical substance, annihilates the patina grown over generations, and in most cases does not permanently solve the actual static problem. In this post, I will show you step by step how I straighten historical wooden doors, carefully correct the fit in the door casing, and adjust the historical, hand-forged hinges – without brute-force methods. In addition, I will comprehensively address a true craftsman’s worst-case scenario: my severely warped living room frame door with filigree historical glass inserts.
Understanding the Nature of Wood: Why Doors Still Work Even After 100 Years
Before we pick up a tool, we absolutely must understand the material. The doors of historical houses were mostly made of slow-growing softwood, very often from winter-felled spruce or resinous pine, which was gently air-dried over years. Wood is and remains a hygroscopic material. This means it permanently absorbs moisture from the ambient air and releases it again. This constant climatic exchange causes the wood to swell and shrink in its width.
Especially in old buildings, where pure, breathable lime plaster is often still used, which excellently regulates the room climate, the massive wooden components also feel these climatic fluctuations throughout the year extremely clearly.
This effect is even more severe with massive exterior doors than with purely interior doors. The outside is directly exposed to the weather, driving rain, and one-sided sunlight, while the inside is exposed to very dry heating air in winter. These strong temperature and humidity gradients within the cross-section lead to warping of the leaves. So before you even think about material removal, you should carefully check the mechanics of the door and the condition of its suspension.
Step 1: Precise Diagnosis and Determining the Pinch Points Using Chalk Edges
The very first step to a successful, restorative repair is the exact analysis of the actual condition. Where exactly does the door stick in the frame? Very often, our hearing deceives us, and the scratching, grinding noise seems to come directly from the floor sill, although actually the upper hinge side is rubbing against the upright frame and merely transmitting the sound. This is where an old but precise method comes into play: the chalk edge.
For this, you only need a piece of soft, ordinary blackboard chalk, ideally in a contrasting color to the wood (for example, blue or red on light varnish). Rub the chalk generously along the edges of the door frame (the casing) at the points where you suspect mechanical resistance. Now carefully close the door and press it lightly into the frame without using force. When you open the door again, you will see exactly on the door edge where the chalk has transferred from the frame to the door leaf. There is actual contact only at these exactly marked, millimeter-precise spots.
My tip: Repeat this process at different temperatures and humidities if the project allows it. This gives you an accurate picture of whether the door permanently rubs or has only temporarily expanded due to the weather. Note down the pinch points with the date on a small sketch or with photos.
Step 2: The Gentle Unhinging of Massive Softwood Doors
Once you have identified the true problem zones, the door must be removed to work on it. The massive softwood doors of a farmhouse are surprisingly heavy and often unwieldy. Careless action can not only lead to personal injury but also bend the valuable historical hardware or cause deep breakouts in the old wood of the frame.
Open the door at an angle of about 90 degrees. Have a long lever ready – ideally a wide crowbar or a special door lifter. Important: Be sure to place a flat piece of scrap wood between the lever and the floorboards or the historical sill to avoid pressure marks on the floor. Now slowly and evenly lift the door. With very old, hand-forged hinges, it can happen that the two door halves literally stick together due to meter-thick old layers of paint or strong flash rust. A few drops of penetrating oil into the gap, an hour of patience for it to take effect, and a slight jiggling of the door leaf often work wonders here. After unhinging, place the door safely on sawhorses.
Step 3: Readjusting Historical Strap Hinges – Using the Straightening Axe
Very often, the actual problem of severely sticking doors is not the warped wood itself, but simply the fatigued hardware. Over the past decades, the metal gives way slightly under the enormous, constant weight of the massive door. The mounted strap hinges can bend slightly, or the hinge pins anchored in the wood of the frame lean downwards, which inevitably causes the door to sag.
Here we resort to the proven method of our ancestors. To bring a slightly inclined hinge pin back into the exact vertical, one uses a heavy straightening axe (Richtbeil) or a massive machinist’s hammer in mandatory combination with a hard piece of oak wood. The hardwood is placed deep down at the base of the hinge pin, and with targeted, forceful blows on the hardwood, the pin is carefully straightened. Never strike directly with a bare steel hammer on the historical forged steel, as this leaves unsightly notches and would destroy the patina of the iron.
The goal of this adjustment is to bring the axis of both hinges (top and bottom) back into an exact vertical alignment so that the heavy weight of the door is once again distributed friction-free and evenly.
Step 4: Targeted Shimming with Brass Washer Rings
If the door stubbornly drags on the floor, even though the hinge pins have been aligned exactly vertically with the straightening axe, the entire frame has probably settled slightly in the masonry over the course of the house’s history. Instead of hastily cutting the door at the bottom edge with a saw, I resort to the most elegant of all solutions: washer rings (Fitschenringe).
For historical doors, I strongly and exclusively recommend the use of rings made of genuine, solid brass. As an alloy, brass is hard enough to bear the high weight of the massive softwood door over decades, but at the same time is much softer than the forged steel of the historical hinges. As a result, the brass ring physically serves as a so-called sacrificial intermediate layer: Should mechanical wear occur due to lack of lubrication, only the replaceable brass ring wears out, but not the irreplaceable historical forged hinge.
Measure the diameter of your hinge pin with a caliper and get suitable brass hinge rings in fine thicknesses of 1 to 2 millimeters from specialized retailers for restoration supplies (an excellent point of contact for such special tools and hardware is, for example, Dictum). Lightly grease the pin with graphite powder, place the rings on, and re-hang the door as a test. Often, just 2 millimeters of height gain is enough for smooth operation.
Step 5: Correcting the Fit in the Frame Without Using Planing Machines
If the door stubbornly sticks on the vertical lock side despite perfectly aligned and shimmed hinges, we cannot avoid gently working on the affected wooden edge. But as discussed: the rotating electric planing machine remains strictly in the closet.
Instead, I work with traditional hand tools. If the initial chalk edge method showed that the door only presses slightly over a very short length, a fine, hard cork sanding block with 80-grit, followed by 120-grit sandpaper, is often sufficient. Using persistent movements parallel to the wood grain, remove exactly just enough material until the blue chalk mark has just disappeared.
If more material needs to be removed, use a sharpened and finely adjusted hand plane (a so-called smoothing plane). By working slowly by hand, you retain the direct, tactile feel for the wood. You immediately sense emerging knots in the softwood and can sensitively adjust the planing pressure accordingly. After planing, lightly break the fresh edge with fine sandpaper to prevent sharp-edged splintering from future impacts.
Step 6: Thermal Cleaning of Massively Corroded Lock Parts
The most beautiful visual straightening of the wooden door is of little use in everyday life if the rim lock sticks and squeaks. Often, resinous vegetable oil, fine house dust, and rust accumulate inside it over a century, making the mechanics extremely stiff.
A highly gentle, chemical-free, and historically correct method is thermal cleaning. Carefully remove the old rim lock from the inside of the door. Be careful not to round off the original slotted screws. Heat the removed, metallic individual parts with the low setting of a heat gun. Through direct heat exposure, the tough, resinous fats burn to ash; old, painted-over paint residues blister and detach from the metal. Then brush the still-hot parts vigorously with a fine brass wire brush.
Afterwards, rub the completely cooled iron parts paper-thin with a little linseed oil varnish to protect them from new flash rust. For the fine, moving parts inside the lock, it is best to use graphite powder. Unlike oil, graphite does not attract new dust and does not gum up even in frost.
Special Case of Extreme Compensation: Straightening a Severely Warped Frame Door with Glass Insert
Sometimes, when restoring my old house, I encounter severe problems that absolutely cannot be fixed with simple hinge rings and a little sandpaper. A classic, extremely demanding example: My historical living room door with a beautifully crafted glass insert (consisting of several thin glasses with filigree wooden dividers between them), where the vertical board at the front right by the door handle – the so-called upright stile – has warped extremely. This wood has worked heavily over decades, so that the door deviates a good 3 to 4 centimeters from the straight line in the middle of its height and bows massively.
In the past, the carpenter tried to solve this problem pragmatically by inserting wooden wedges at the top and bottom of the door frame to make the door sit at least flush and somewhat tight when closed. While this approach stops the draft, it does not fix the fatal, massive warping of the door itself. To permanently straighten such a severely bent board without having to replace the valuable original wood, I use the complex method of relief cuts.
Step 7: Gently Removing Historical Glass
Before I can straighten the wood, the panes must come out. This is often the most time-consuming part. Old glass panes are mostly secured with rock-hard linseed oil putty or tiny, rusted wire pins in thin glazing beads.
- Softening the putty: Old linseed oil putty becomes as hard as concrete over the decades. Trying to scrape it out cold often leads to glass breakage. The solution is gentle heat. I use a heat gun set on low (with a shield towards the glass!) to heat the putty in sections. From about 60 to 80 degrees, the putty becomes soft and plastic again.
- Removing the putty: As soon as the putty is soft, I carefully scrape it out of the rebate with a blunt putty knife or a special glazier’s hammer. In doing so, I make sure not to exert any leverage against the glass pane!
- Loosening the glazing beads: If the panes are held with fine wooden beads instead of putty, I have to find the tiny nails. For this, I scrape the paint off in the corners. I use fine pincers to grip the heads. If they are seated too tightly, I drive them completely through the bead with a very fine punch instead of prying the bead off forcefully, which would break it.
- I store the fragile panes standing up, not lying down, and well-padded in a safe place.
Step 8: The Technique of Radial Relief Cuts and Gluing
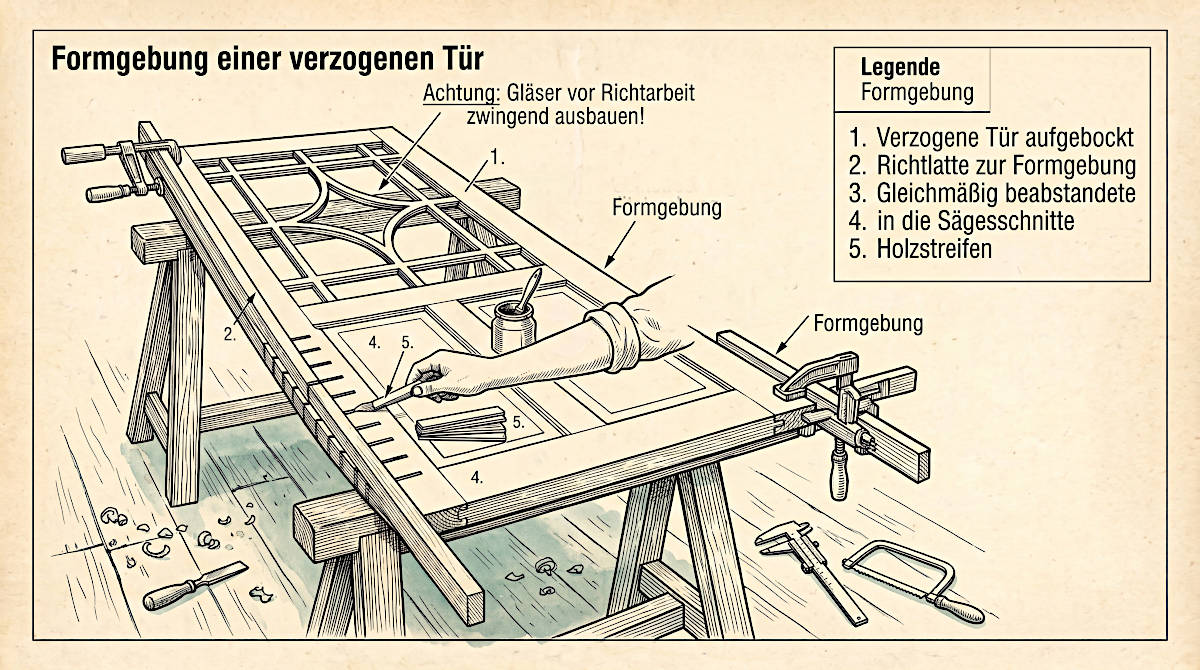
After the glass has been safely removed and stored, I lay the door flat on sturdy sawhorses. Now I have to strategically decide from which side I work. One side faces the kitchen, the other the living room. The living room side is the representative visible side. Therefore, I make the repair cuts on the side facing the kitchen.
However, it makes no sense to make the cuts on the outward-bowed side, because then the kerf would have to be compressed and would only hold by glue. The inward-bowed side is better, because then you can glue strips into the cuts that are slightly wider than the saw cut. This way, the door is automatically stretched.
A single cut is physically not enough for a massive warp of 4 centimeters. The tension sits deep in the three-dimensional grain direction of the wood. I have to remove the resistance from the material in sections.
This is how I proceed:
- Making the cuts: With a plunge saw precisely set to depth or an extremely fine, hand-held Japanese saw (Ryoba), I saw the bowed, vertical stile horizontally (i.e., exactly across the wood grain) deeply multiple times. These cuts start just above the door hardware, evenly distributed over the entire length of the deformation.
- The right spacing and depth: I make such a cut every 5 to a maximum of 10 centimeters. The cuts must absolutely not completely sever the wood! I leave about 2 to 3 millimeters of wood remaining. This fine hinge prevents the stile from falling apart.
- Over-stretching on the sawhorses: Now comes the statically decisive part. The door is clamped under tension on the sawhorses using massive screw clamps and absolutely straight square timbers (so-called cauls). Through the slow pressure of the clamps, I now force the board not only back into a straight line, but intentionally over-stretch it slightly in the opposite direction. The wood yields, as the deep cross-cuts have completely relieved the internal tension. On the sawn side, the fine saw cuts now open up slightly in a V-shape.
- Wood selection and gluing: I glue exactly fitting wooden strips into these newly formed, wedge-shaped gaps. My tip: It is absolutely essential to ensure that the grain direction of these small wedges exactly matches the grain direction of the door stile (i.e., lengthwise to the stile), otherwise they will work differently with moisture and fall out in winter. I use high-quality fish glue for gluing. This cold liquid hide glue is perfect for historical repairs: it offers a sufficiently long open time, which is enormously important given the large number of wedges and the simultaneous adjustment of the clamps. Furthermore, it sets extremely hard and remains, fully in the spirit of heritage conservation, reversible through heat and moisture. These glued-in strips permanently fix the soft wood in its new, straightened position.
- The flush fine sanding: As soon as the fish glue is completely cured, I remove the clamps. The wood of the wedges that still protrudes is now worked off flush and finely sanded with a sharp chisel or plane. With a little tinted wood filler, this elaborate repair spot will later visually blend into the painted door, and the valuable historical basic substance is preserved.
I work slowly when clamping and listen carefully to the wood; it must not crack. The slight over-stretching during clamping is important, as the wood has a minimal natural restoring force after the screw clamps are removed. As soon as everything is successfully straightened, the historical glass panes can be freshly puttied and the thin dividers inserted again completely free of tension.
Step 9: The Right Surface Care After Restoration
The elaborate straightening and refurbishing of doors in an old house is definitely not a job for the impatient. It requires a lot of dedication and the firm will to engage with the peculiarities of the historical, organic material. When the door falls back snugly and quietly into the frame after the repair, the brass rings do their job unobtrusively, and the heavily warped frame door closes straight again, I have not only restored a mechanical function. I have preserved a valuable piece of genuine craftsmanship for the next decades.
After all the sanding and gluing work, the wood should be protected again. I avoid modern, breathability-blocking acrylic paints. Historical softwood doors were almost always treated with oil-based systems. After the repair, I apply a high-quality half-oil (a 1:1 mixture of natural linseed oil and natural balsam turpentine oil) to the raw wood. If you like it colorful, reach for stand oil paints (you can often find information and excellent products for this at natural building material dealers like Kreidezeit). These oils penetrate deep into the wood, crystallize there, and protect it from the inside out against penetrating moisture, without completely sealing off the wood.
My tip: Observe the repaired door intensively in the first few months after straightening. The wood reacts very sensitively to the new tension conditions and the changing room climate. Apply a little oil to the hinges once or twice a year and always keep the wooden sills on the floor free of binding dirt. An old house lives, breathes, and works, and its doors are a living part of this cosmos. Treat them with craftsman’s respect, and they will bring you joy for a long time.