
The hilly landscapes of Transylvania are characterized by a rugged, natural beauty. If you own or manage a property in this region, you are often faced with the challenge of securing the soil from slipping on slopes. Concrete walls are functional, but rarely blend harmoniously into the rural, historical picture and also seal valuable surfaces. A traditional and ecologically much more sensible alternative is the dry stone wall made of fieldstones.
In this article, I describe how I build such a wall entirely without mortar or concrete, permanently secure my slope, and at the same time create a habitat for the local fauna.
Why Fieldstones Are the Best Choice
Fieldstones are a well-tried and often readily available building material in Transylvania. They are unearthed during the agricultural cultivation of the soil or can be found in dried-up riverbeds and along forest edges. I secured the stones that were left over from the demolition of an old house in the neighboring village and were meant to be disposed of. By using local stones, I largely save on transport costs and ensure that my structure integrates visually perfectly into the surroundings.
By the way: For the eye, the structured stone surfaces offer wonderful, rustic textures that constantly change in the shifting light of the day and look much more natural than a gray concrete surface.
A New Biotope for Local Wildlife
A dry stone wall is much more than just slope protection. Because this construction method deliberately avoids mortar, countless joints, cracks, and small caves are created between the fieldstones. The massive stones heat up in the sun during the day and slowly release the stored heat back into the environment during the cool night.
This microclimate attracts many beneficial animals:
- Reptiles: Sand lizards and slow worms use the warm stones for sunbathing and the deep, frost-proof crevices as a safe hiding place.
- Amphibians: In the damper, lower areas at the foot of the wall, common toads find an ideal shelter.
- Insects: Wild bees, bumblebees, and beneficial ground beetles nest in the cavities and help you pollinate your garden as well as with natural pest control.
Step-by-Step Guide: How I Build a Dry Stone Wall
Building a dry stone wall requires some physical work and, above all, patience, but it is also absolutely doable for laypeople if you follow a few basic physical rules.
Step 1: Preparing the Foundation
Even a dry stone wall needs a solid foundation so that it does not sink over the years. For this, I dig a trench that is about a third of the planned wall height deep. The width at the base should be about half the wall height. I fill this trench with a layer of coarse crushed stone or gravel and compact the material well, for example with a hand tamper.
Important: Backfill and Drainage
To prevent the wall from breaking open during frost, the backfill is important. Between the natural soil of the slope and the back of the stone wall, an approximately 15 to 20-centimeter-wide layer of crushed stone or coarse gravel must be installed.
Seepage water from the slope can easily flow downwards through this gravel or through the stone joints, instead of backing up in the earth behind the stones. If water were to collect there and freeze in winter, it would expand and crush the wall. A drainage pipe at the very bottom of the gravel bed also helps to safely and in a controlled manner divert large amounts of water to the side after heavy rainfall, but it is not absolutely necessary because the natural soil itself either absorbs enough water or does not allow it to seep in.
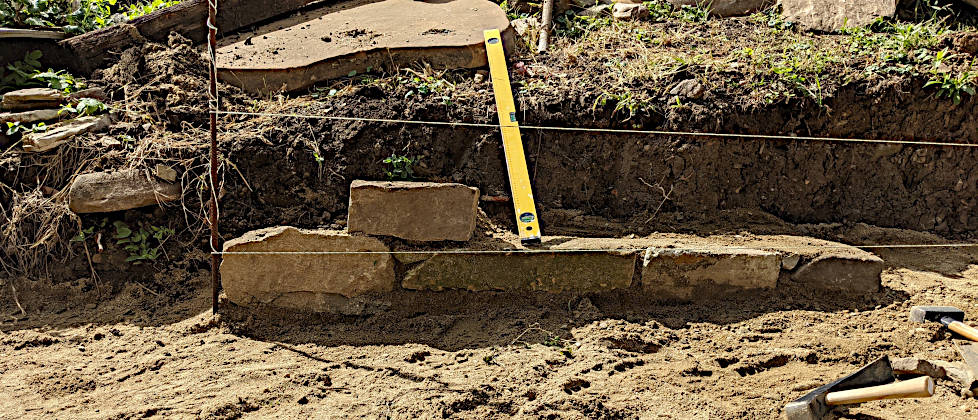
Step 2: Laying the Base
First, I look for large and heavy fieldstones. I place these lying flat directly on the compacted gravel bed. The bottom row carries the most weight and must lie absolutely stable. I move them back and forth in a slight twisting motion so that they embed themselves form-fittingly into the gravel bed. The stones are tilted very slightly towards the slope. This is called a ‘batter’ (about 10 to 15 percent). This later gives the wall the necessary stability against the earth pressure from behind.
Step 3: Raising the Wall
Now I stack the other stones on top. In doing so, I make sure to avoid so-called cross joints. A vertical joint of the lower row should always be covered by a solid stone of the next row. I use smaller stone splinters to pad wobbly stones and wedge them tightly. Each stone must sit stably before the next one is placed on top. I also sprinkle a little gravel (0-8mm) into the joints and as a horizontal joint. This achieves a higher form fit and thus increases stability.
My Tip: Sort the fieldstones roughly by size and shape if possible. Then you don’t have to look long for the right piece and you keep your rhythm. For me, all the stones are in one big pile, which makes it more difficult. Also, build up the gravel backfill row by row parallel to the wall; this gives the structure stability right during construction. I deliberately build in a stone every now and then that protrudes far to the back. I place it on the gravel bed. When topsoil is later filled up behind the drainage gravel again, such stones act like a wall anchor and hold the wall in place.
Step 4: Planting the Joints
I fill some joints with a little loamy soil and plant drought-resistant plants or moss. Stonecrop, houseleeks, or creeping thyme are excellently suited. Over time, these plants additionally strengthen the structure with their roots and offer the insect world even more food.
Further Sources of Information
If you want to delve deeper into the topic of near-natural gardening and wall building, you will find valuable resources here:
- The Nature and Biodiversity Conservation Union (NABU) offers comprehensive guides on the importance of dry stone walls for species protection: NABU: Dry stone walls in the natural garden.
- The Nature Conservation History Foundation often offers historical background knowledge on the management of cultural landscapes, which can be very exciting, especially in the context of Transylvania.
- For very specific practical construction questions, it is often worth taking a look at the portals of agricultural chambers or forums for ecological building.