
An old well on your own property is much more than just a historical gem in the courtyard. It offers a tangible chance for a piece of independence and a self-sufficient water supply. But years or even decades of standstill leave their mark. Before I can safely use the water as utility water for flushing the toilet, for manual work (such as mixing mortar and limewash or cleaning tools), and of course for watering the garden, a professional revitalization is necessary.
In this technical guide, I show step-by-step how I carry out the cleaning of my well and ensure water quality in the long term. A small advantage: Here in Romania, fortunately, there are still traditional well cleaners offering their services and passing on valuable knowledge.
Life-threatening Danger from CO2 in the Shaft: The Candle Test
Before I even set foot in the well shaft, I must be aware of an invisible and odorless danger: carbon dioxide (CO2) and other putrefaction gases. These gases are heavier than air and collect unnoticed at the bottom of the shaft. A naive descent is absolutely life-threatening.
My safety check tip: I strictly perform the classic candle test before every descent. I place a lit candle in a bucket and slowly lower it down to the bottom of the well using a rope. While doing this, I watch the flame closely. If the candle goes out on the way down, there is an acute lack of oxygen in the shaft! In this case, I do not enter the well under any circumstances. Instead, I arrange for mechanical forced ventilation or leave the descent to a certified well builder with appropriate breathing apparatus.
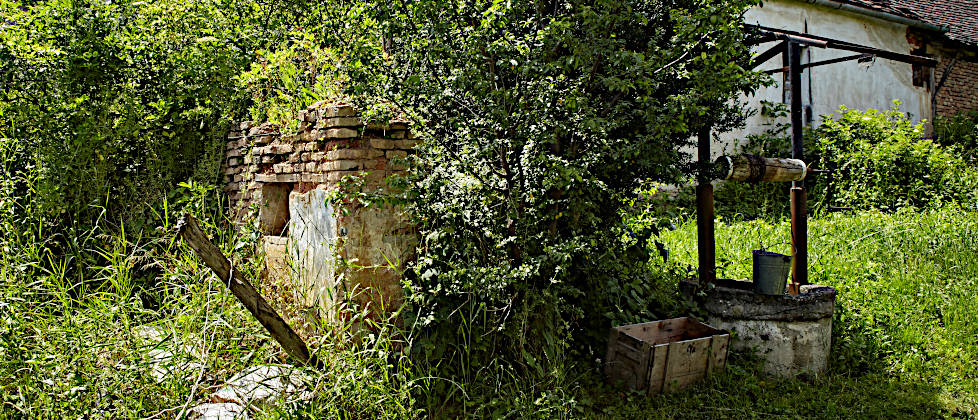
Step 1: Pumping Out the Old Water
The first practical step of revitalization is completely emptying the well shaft. For this, I need a powerful submersible dirty water pump. I do not let clear water at the surface deceive me; unpleasant surprises often await in the lower area. I pump the water out as far as possible. I make sure where I direct the water – it should neither undermine the foundation of my buildings nor flow directly into a sensitive biotope, as it could be heavily contaminated with germs or heavy metals.
Step 2: Removing the Sludge from the Bottom
Once the water is pumped out, the real problem usually reveals itself: the well sludge. Over the years, leaves, branches, insects, and sometimes small animals fall into the shaft and decompose at the bottom into a thick, foul-smelling layer of sludge. This sediment is the ideal breeding ground for bacteria and permanently clouds the water.
This sludge must be removed completely. Depending on the depth and accessibility of the well, this is done manually with buckets and a rope winch. Only when the water-bearing layer (the so-called well bottom) consists of clean gravel or sand again can fresh, clear water flow in.
Step 3: Mechanically Cleaning the Well Shaft and Walls
When the bottom is cleared, the focus shifts to the walls of the shaft. Whether natural stone, brick, or concrete rings – algae, moss, and sometimes strong roots settle on the damp walls, which can damage the masonry. These deposits must be removed mechanically.
I use hard brushes, spatulas, and, if the masonry is stable, a high-pressure cleaner. However, with historical, brick-built wells, I am careful not to wash out the old joint mortar. My tip: I use my skills as a photographer and document the condition of the joints and stones before and after cleaning with my camera. This gives me a perfect reference to check in the coming years whether cracks are forming or stones are loosening.
Step 4: Disinfection with Quicklime
Even if the well looks clean, there are still microbiological contaminants in the pores of the walls and in the bottom. A chemical shock chlorination is not done here in the area. Instead, I disinfect the well traditionally by using chunks of quicklime.
To do this, I carefully drop the quicklime chunks into the newly accumulated water. The lime reacts, raises the pH level significantly, and effectively kills bacteria and germs. After a sufficient exposure time, I have to completely empty the well several times until the water is completely clear again and the lime has been fully flushed out. Important: When working with quicklime, I strictly wear protective equipment such as gloves and safety goggles, as the material is highly corrosive.
Step 5: Arranging a Professional Water Analysis in the Laboratory
The well is now clean and disinfected. Even though I primarily use the water as utility water for the toilet, as working water for mortar and tools, or for the garden and do not drink it directly, an important step remains: checking the water quality. I never rely on a clear appearance or neutral taste, especially when it comes to garden watering, where the water might come into contact with grown food.
Utmost caution is advised, precisely because of the neighboring agricultural farms. There is a risk that liquid manure, slurry, or other substances seep into the soil and potentially end up in my well water. In the past, this was less of a problem because the animals were kept on the pasture during the day, but today you have to take potential groundwater contamination very seriously. Added to this is another very local problem: There is currently no sewer system in my village. The traditional little houses – the outhouses in the back corner of the courtyard – are still quite standard here in the neighborhood. Although I myself use a classic 3-chamber septic tank to treat my wastewater, regular testing is essential under these conditions to absolutely rule out fecal bacteria in my own groundwater and well water. Therefore, I must take a water sample and have it examined in an accredited laboratory. Chemical parameters (such as nitrate, iron, manganese, pH value) and microbiological values (coliform bacteria, germ count) must be tested. Only an official laboratory report gives me the certainty that my well water meets the standards and can be safely used for the house and garden in the long term.
Further Contact Points and Information
If I want to delve deeper into the topic or am looking for a laboratory, these contact points will help me further:
- My local health department: The best first point of contact. There I can get lists of certified water laboratories in my region and information on the legal reporting requirements for private well systems.
- Environmental authorities: National or regional environmental agencies offer comprehensive guides on the subject of “Healthy drinking water from private wells and springs”. Detailed guidelines are usually available as PDFs on their websites.
- Accredited laboratories: Professional testing institutes or agricultural investigation offices often offer standardized test kits. I receive a sterile container in the mail, fill in the water, and send it back by post.
The revitalization of my well requires physical effort and technical care. But the effort is worth it: With a self-sufficient water source, I not only increase the value of my property but also gain a great deal of independence.